Making homemade bread is a rewarding experience that connects you to the age-old tradition of baking. The aroma of fresh bread wafting through your home can evoke feelings of comfort and nostalgia. Whether you’re a seasoned baker or a complete novice, the process of creating your own loaf can be both satisfying and enjoyable. It’s not just about the end product; it’s about the journey of transforming simple ingredients into something delicious.
Homemade bread allows for creativity and personalization. You can experiment with different flours, add-ins, and techniques to create a loaf that suits your taste. Plus, there’s something special about slicing into a warm loaf that you’ve made yourself. In this guide, we’ll walk through the essential steps of making bread at home, from gathering ingredients to enjoying the final product.
If you’re exploring the art of homemade bread, you might also enjoy a refreshing side dish to complement your freshly baked loaf. Check out this article on a delicious Crunchy Creamy Cucumber Avocado Salad, which pairs perfectly with warm bread and adds a vibrant touch to your meal. Whether you’re enjoying a simple slice of buttered bread or crafting a gourmet sandwich, this salad is a great way to enhance your dining experience.
Key Takeaways
- Homemade bread is a rewarding and delicious way to enjoy fresh bread at home.
- Basic ingredients and equipment needed for homemade bread include flour, yeast, salt, water, a mixing bowl, and a baking sheet.
- Mixing and kneading the dough is an important step in developing the gluten and creating the bread’s structure.
- Proofing the dough allows the yeast to ferment and the dough to rise, resulting in a light and airy texture.
- Shaping and baking the bread requires attention to detail and proper technique to achieve a beautiful and tasty loaf.
Ingredients and Equipment Needed
Before diving into the baking process, it’s crucial to gather all the necessary ingredients and equipment. The basic ingredients for most bread recipes include flour, water, yeast, salt, and sometimes sugar or fat. All-purpose flour is a common choice, but you can also use bread flour for a chewier texture or whole wheat flour for added nutrition. Yeast is the magic ingredient that helps the dough rise, while salt enhances flavor and controls fermentation.
In terms of equipment, you don’t need much to get started. A large mixing bowl is essential for combining your ingredients, and a wooden spoon or spatula will help with mixing. A clean surface for kneading is also important; a countertop or large cutting board works well. If you have a kitchen scale, it can be helpful for measuring ingredients accurately, especially when working with flour. Lastly, a baking sheet or loaf pan will be needed for baking your bread.
Mixing and Kneading the Dough
Once you have your ingredients ready, it’s time to mix them together. Start by combining the dry ingredients—flour, yeast, and salt—in your mixing bowl. If you’re using sugar, add it in at this stage as well. Next, gradually add warm water to the dry mixture while stirring with your wooden spoon. The goal is to create a shaggy dough that pulls away from the sides of the bowl.
After mixing, it’s time to knead the dough. This step is crucial as it develops gluten, which gives bread its structure and chewiness. Turn the dough out onto a lightly floured surface and begin kneading by pushing it away from you with the heel of your hand, then folding it back over itself. Rotate the dough a quarter turn and repeat this process for about 8-10 minutes. You’ll know it’s ready when the dough is smooth and elastic. If it feels too sticky, sprinkle a little more flour as needed.
Proofing the Dough
Proofing is an essential step in bread-making that allows the dough to rise and develop flavor. After kneading, shape your dough into a ball and place it in a lightly greased bowl, covering it with a damp cloth or plastic wrap. This helps retain moisture while preventing the dough from drying out. Find a warm spot in your kitchen—like near a sunny window or on top of the refrigerator—where the dough can rise undisturbed.
Let the dough proof for about 1 to 2 hours or until it has doubled in size. The time may vary depending on the temperature of your kitchen and the type of yeast used. During this time, the yeast ferments and produces carbon dioxide, which creates air pockets in the dough. This process not only helps with rising but also contributes to the flavor profile of your bread.
If you’re interested in expanding your culinary skills beyond bread making, you might enjoy exploring delightful summer treats.
One such article features a collection of strawberry desserts that evoke the essence of summer, perfect for complementing your homemade bread.
You can check it out here for some refreshing ideas that will elevate your seasonal gatherings.
Shaping and Baking the Bread
| Ingredients | Measurements |
|---|---|
| All-purpose flour | 3 cups |
| Active dry yeast | 2 1/4 teaspoons |
| Warm water | 1 1/2 cups |
| Sugar | 1 tablespoon |
| Salt | 1 teaspoon |
| Olive oil | 2 tablespoons |
| Cornmeal | For dusting |
Once your dough has risen sufficiently, it’s time to shape it into its final form. Gently punch down the dough to release any trapped air bubbles before turning it out onto a floured surface. Depending on your preference, you can shape it into a round loaf or place it in a loaf pan for sandwich-style bread. If you’re feeling adventurous, consider braiding or twisting the dough for an eye-catching presentation.
After shaping, let the dough proof again for about 30 minutes to an hour. This second rise allows the gluten to relax and results in a lighter texture. Preheat your oven to around 375°F (190°C) during this time so that it’s hot and ready when your bread is finished proofing. Just before baking, you can make slashes on top of the loaf with a sharp knife; this helps control how the bread expands in the oven.
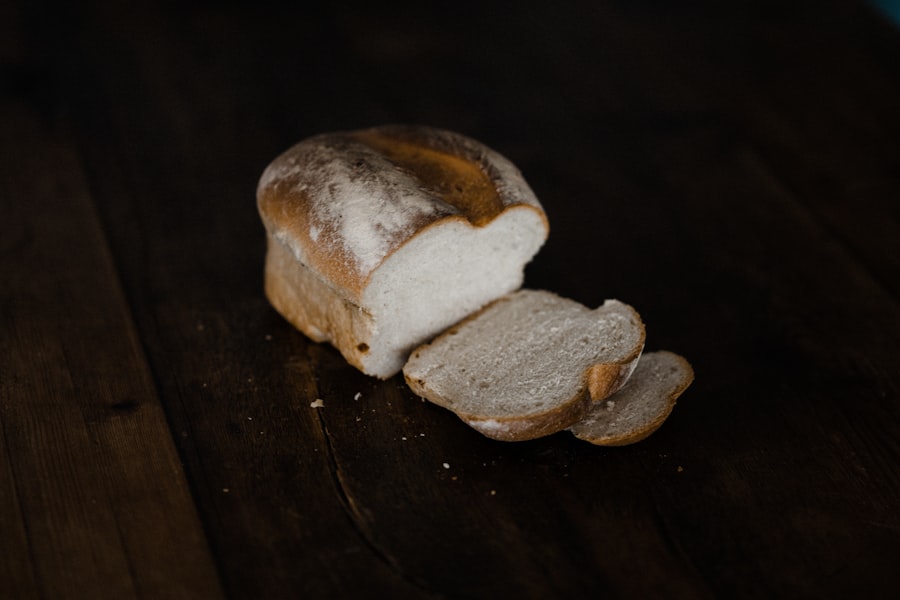
When it’s time to bake, place your shaped dough in the oven and let it work its magic. Baking usually takes about 25-35 minutes, depending on the size and shape of your loaf. You’ll know it’s done when the crust is golden brown and sounds hollow when tapped on the bottom. Allow your bread to cool on a wire rack before slicing; this helps set the crumb structure.
If you’re looking to enhance your homemade bread experience, you might find it interesting to explore how to pair your freshly baked loaf with a delicious soup. A great option is to try making a comforting bowl of chowder, which complements bread perfectly. For a delightful recipe, check out this article on Blushing New England Fish Chowder, where you can discover a flavorful dish that will elevate your meal and make your homemade bread even more enjoyable.
Tips for Success
Baking bread can be tricky at times, but there are several tips that can help ensure success.
First, always measure your ingredients accurately; even slight variations can affect the outcome of your bread.
If you’re using active dry yeast, make sure to activate it in warm water before adding it to your mixture; this ensures that it’s alive and ready to work.
Another important tip is to pay attention to temperature. Yeast thrives in warm environments but can be killed by excessive heat. If your kitchen is too cold, consider placing your dough in an oven with just the light on to create a warm environment for proofing. Additionally, don’t rush through the kneading process; taking your time will yield better results.
Variations and Additions
One of the best parts about making homemade bread is that you can customize it to suit your tastes. Consider adding herbs like rosemary or thyme for an aromatic twist or incorporating seeds such as sesame or poppy for added texture. You can also experiment with different types of flour—rye or spelt can add unique flavors and nutritional benefits.
If you’re feeling adventurous, try adding ingredients like cheese, olives, or sun-dried tomatoes for savory loaves or dried fruits and nuts for something sweet. You can even create flavored breads by incorporating spices like cinnamon or nutmeg into your dough. The possibilities are endless, so don’t hesitate to get creative!
Conclusion and Enjoying Your Homemade Bread
After all that hard work, it’s finally time to enjoy your homemade bread! Slice into that warm loaf and take in the delightful aroma—it’s truly one of life’s simple pleasures. Whether you enjoy it plain with butter, as part of a sandwich, or toasted with jam, there’s something special about savoring bread that you’ve made yourself.
Remember that baking is as much about learning as it is about enjoying the final product. Don’t be discouraged by any missteps along the way; each loaf teaches you something new. So roll up your sleeves, gather those ingredients, and start baking! Your kitchen—and taste buds—will thank you for it.
FAQs
1. What ingredients do I need to make homemade bread without a bread machine?
To make homemade bread without a bread machine, you will need flour, yeast, salt, water, and optionally, sugar and oil.
2. What is the process for making homemade bread without a bread machine?
The process for making homemade bread without a bread machine involves mixing the ingredients, kneading the dough, allowing it to rise, shaping the dough, and then baking it in the oven.
3. How long does it take to make homemade bread without a bread machine?
The total time to make homemade bread without a bread machine can vary, but it typically takes around 3-4 hours from start to finish, including rising and baking time.
4. Can I customize the recipe for homemade bread without a bread machine?
Yes, you can customize the recipe for homemade bread without a bread machine by adding different ingredients such as herbs, cheese, or nuts to the dough, or by using different types of flour for a unique flavor.
5. What are some tips for making homemade bread without a bread machine?
Some tips for making homemade bread without a bread machine include using warm water to activate the yeast, kneading the dough until it is smooth and elastic, and allowing the dough to rise in a warm, draft-free place for the best results.